关于环境,你需要知道的事
变量
变量的作用域
作用范围见图,更高优先级的变量会覆盖低优先级的同名变量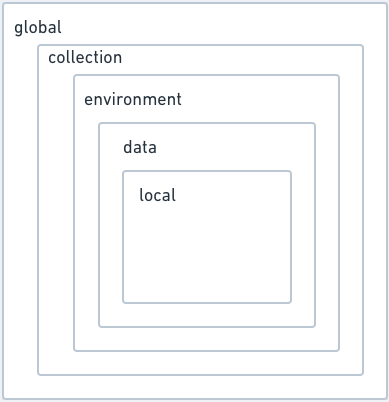
如何使用变量
假设一个变量url = http://localhost,使用时输入就可以引用变量代表的值。因为变量都是以字符串形式保存的,你可以在任何可以输入的地方引用它,比如URL、parameters、headers、authorization、request body等。
打印变量
在脚本中输入console.log(foo)可以打印变量的值,在菜单栏view中选择Show Postman Console
从文件中获取变量
postman支持读取csv和json格式的文件,从文件中得到相应变量的值,请记住,postman只允许在执行一个collection时选择数据文件,不能提前导入文件,在collection runner中的Data选项中选择你的CSV或者JSON文件
例如你的CSV文件中的数据是:
1 | path, value |
选择文件后,可以预览文件中的数据,看看是否是自己预期的:
执行的时候你会发现请求了4次,因为你的数据又4组
动态变量
postman提供了一系列的变量可以拿来直接用,比如你可以用来来表示一个uuid-v4风格的guid,用得到过去某个时间点的时间戳,表示随机月份。查看所有动态变量。要注意的是,这些变量只能用于请求的URL、headers和body中。
关于请求,你需要知道的事
控制台(CMD/CTRL + ALT + C)
在菜单栏的View.Show Postman Console可以打开postman的控制台,里面包含我们请求的完整信息和在脚本中打印的日志。你可以在脚本中用console.log(),console.warn()等打印所需的日志。
授权
有时候API调用时需要进行授权,授权数据可能是在header、body或者request的parameters中,postman可以帮助我们自动添加这些数据。
如何添加授权信息
在具体的某个请求中,点击Authorization栏选择具体的授权类型,然后就可以在右侧编辑相关的值。如果整个collection都用的一样的授权,你可以在collection的更多菜单里选择编辑,然后在Authorization栏编辑授权信息。

设置好了以后集合里的请求都默认用这种授权,你也可以在请求中单独再设置特殊的授权。设置完成后点击Preview Request可以预览授权信息在请求中的样式。
Bearer token
定义:为了验证使用者的身份,需要客户端向服务器端提供一个可靠的验证信息,称为Token,这个token通常由Json数据格式组成,通过hash散列算法生成一个字符串,所以称为Json Web Token(Json表示令牌的原始值是一个Json格式的数据,web表示是在互联网传播的,token表示令牌,简称JWT)
Basic auth
定义:基于用户名和密码的加密方式,他的格式是Basic <Base64 encoded username and password>,用户名和密码都是Base64编码的字符串,跟在文本“basic”后。

Digest auth
这种认证方式的一般流程是,先发送一个请求,服务端会返回一个401和若干信息,然后你再用得到的这些信息配合用户名和密码发送请求。postman会自动尝试填充advanced的选项中。
OAuth 1.0
有时候需要用到第三方服务,postman也提供了OAuth授权方式。1.0的协议是consumer用一个key和secret向第三方服务请求access token,第三方服务会给到一个初始的的token,consumer用这个token获得用户的授权以后,就可以向第三方服务申请到access token,并用这个token来获取用户数据。
填好Consumer Key, Consumer Secret, Access Token, 和Token Secret,选择你想要放置这些字段的地方,body、header等
OAuth 2.0
选择OAuth 2.0授权类型,选择放置的位置,右边点击Get New Access Token,填好必要字段,点击Request Token,如果成功了的话你会看到返回的token、过期日期等信息,有时也会有refresh token,点击Use Token使用token。

添加Cookies
管理cookies

新建cookies
点击Add Cookie按钮,下面就出现一个预置的cookie字符串,修改后点击保存即可。
增加域名
给一个不在当前域名列表里的域名增加cookie,可以在上方输入域名(不输入端口号和http://),点击Add按钮即可,点击该域名然后增加cookie。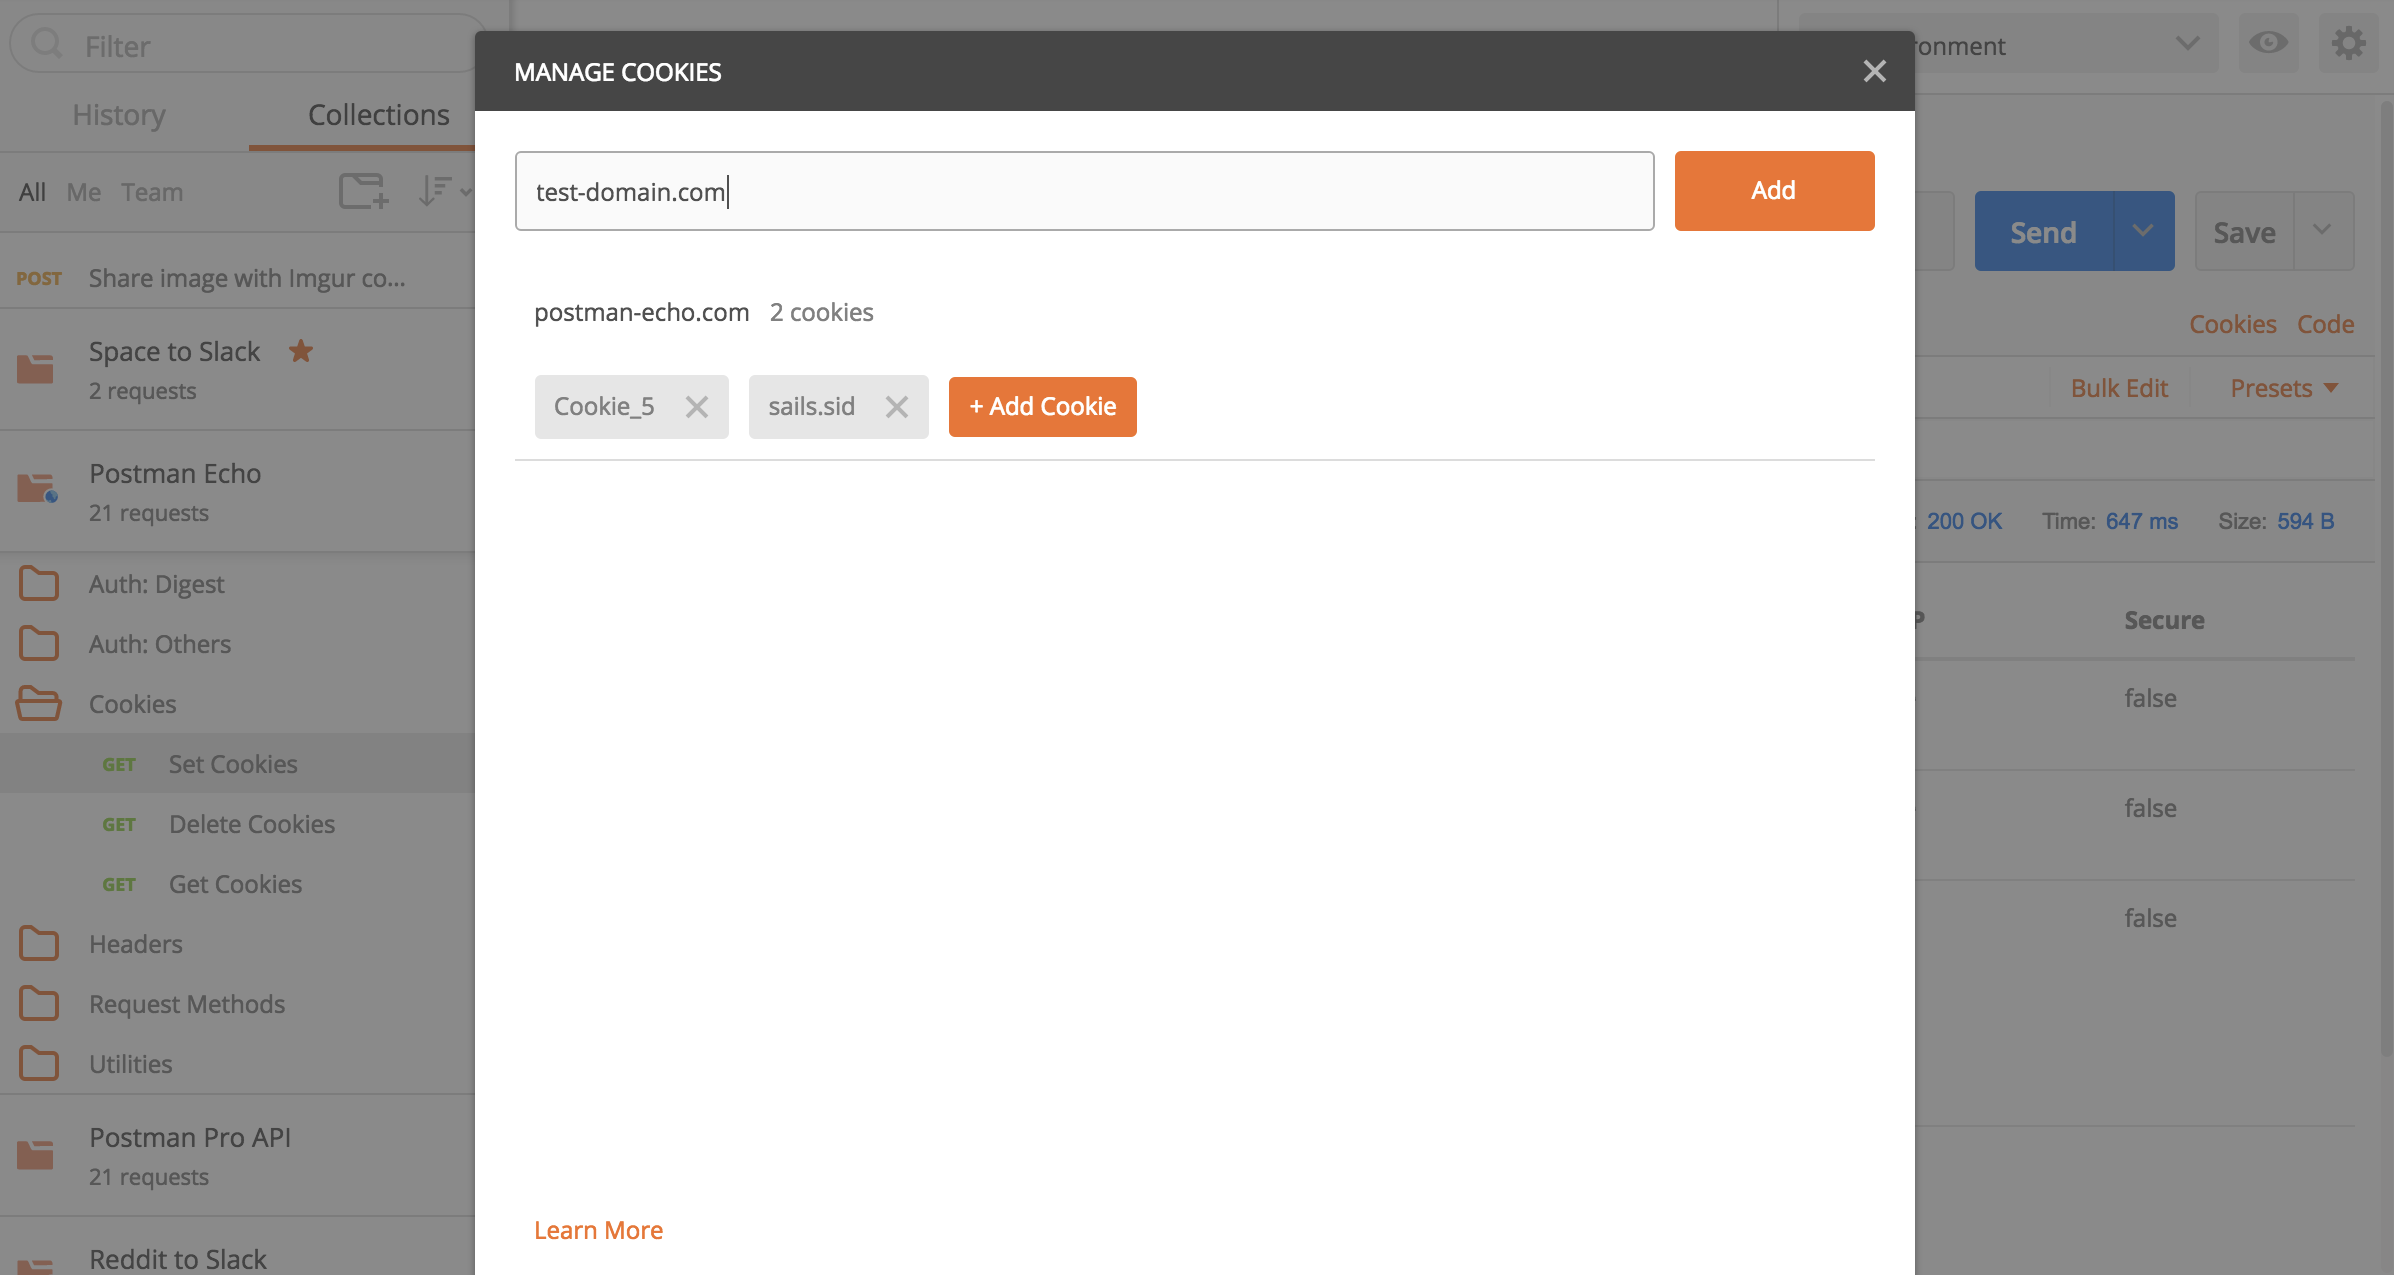
添加证书
postman应用中可以查看和设置ssl证书。点击菜单栏中的设置图标,选择settings,切换到Certificates一栏,点击Add Certificate,在host中填写域名(不带协议),上传CRT file和KEY file,如果有Passphrase也写上,没有就空着。
当你添加好证书以后,发送请求时回自动带上证书信息,打开控制台就可以看到:

捕获HTTP请求
使用interceptor捕获浏览器请求
第一种:chrome浏览器中安装插件Postman Interceptor就可以捕获浏览器中的http请求,启动postman的chrome app,就可以同步到你的postman app中查看。
第二种:安装Interceptor Bridge(下载地址)在postman 本地app中启动interceptor,看到他的status是INTERCEPTOR CONNECTED就可以了。
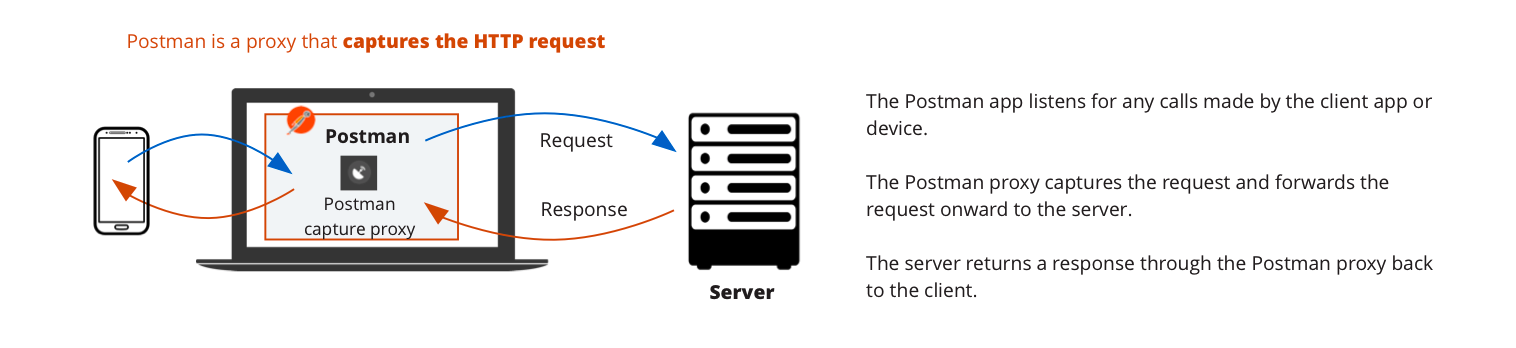
用postman作为代理捕获请求
将postman设置为代理后,他可以监听你电脑或手机上发出的请求,捕获并发送给服务端,然后接收服务端的响应再给客户端。他的原理可以用这张图理解:
第一步:打开代理,点击右上角的捕获图标,打开Capture Request开关,设置端口,默认5555,捕获的请求保存在History中。

第二步:保证你的手机和你的电脑处于同一Wi-Fi下,在手机Wi-Fi设置中设置好代理信息,IP是电脑的IP,端口是刚刚设置的5555。
然后切换到postman应用中就可以看到History栏中捕获到的请求。
关于代理
代理可以做很多事情:
- Record all traffic between your machine and the internet
- Reveal the contents of all requests, responses, cookies, and headers
- Route traffic to specified internet locations
- Debugging
- Security from direct attacks
- DevOps load balancing

配置全局代理
如果你所有的应用都是用的相同的配置,那么可以选择使用全局代理。从设置中找到Proxy栏,选择Proxy Type,默认http和https请求都会被勾选上。设置代理服务器的IP地址和端口,设置代理服务器是否需要授权,需要的话还要填写用户名和密码。有些请求不需要经过代理的,可以在Proxy Bypass中填写。

配置系统代理
当打开系统代理时,意味着让postman遵循你系中的代理设置,在这种场景下,postman app等同于用系统默认配置去发送请求,系统代理把请求发送给服务端,服务端通过系统代理返回响应。系统代理是默认开启的 ,如果系统代理和全局代理是同时开启的状态,postman会使用全局代理的配置。

发送SOAP请求
postman支持发送SOAP请求,用SOAP endpoint 作为请求的 URL,method选为post,body的类型选择为text/xml,在body中定义好SOAP Envelope, Header and Body即可。
使用GraphQL
什么是GraphQL?postman可以允许直接创建和储存GraphQL schemas,自动完成GraphQL查询。
发送GraphQL查询
body type选择GraphQL,将你的查询语句写进去就可以了。postman的编辑器允许你同时编辑查询语句和变量。

导入GraphQL schemas
点击左侧的APIs栏,点击+ New API,你可以选择创建或者导入,添加完毕点击保存,然后去collection栏,在body中选择GraphQL,在输入查询语句时,就可以自动提醒你有哪些GraphQL。
自动填充GraphQL
当你创建/导入了GraphQL schema,在body type中GraphQL选项里就可以点击下拉菜单选择。

可视化API响应(毕竟有意思的课题,抽时间继续看一下)
postman提供了一种可编码的方式来可视化地展示了请求的响应,
关于集合,你可能还不知道的事
支持markdown编辑
集合、文件夹和请求的描述都是支持markdown格式的。

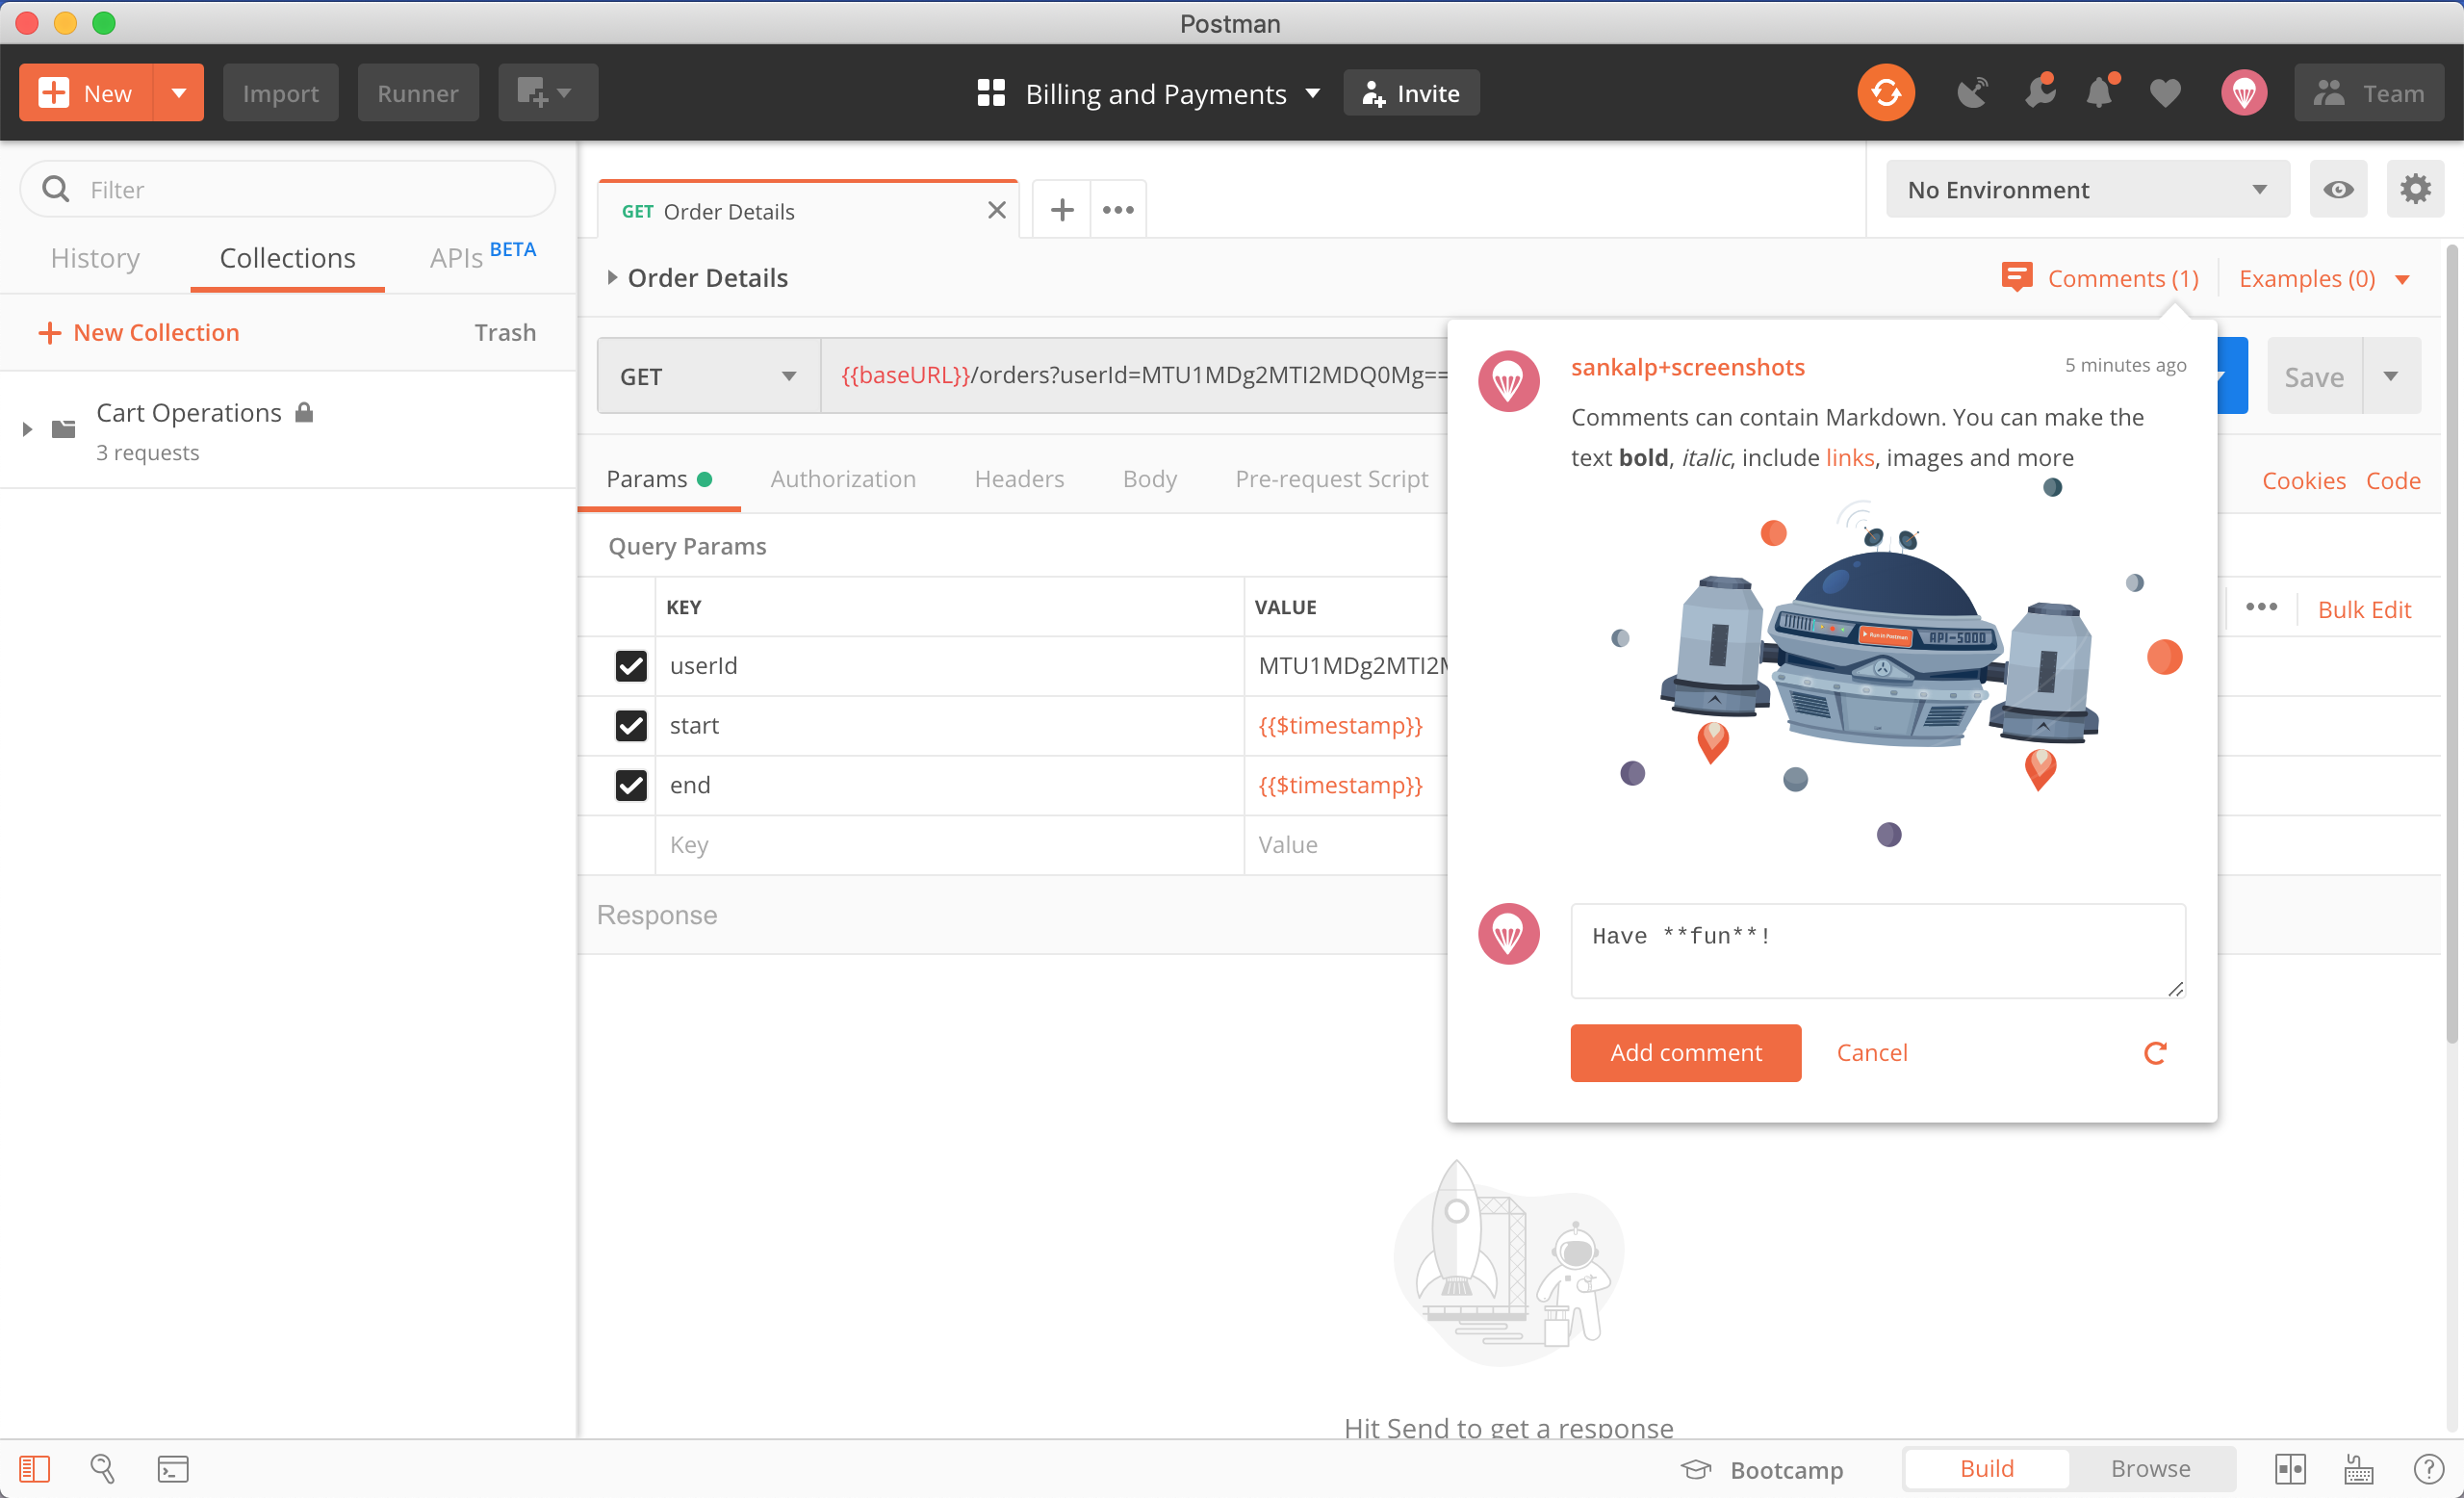
支持评论
可以在已保存的请求中点就Comments选项,就可以添加评论,还可以在评论中at你的项目成员,被at的成员会收到postman 的通知,评论文本也支持markdown格式。
版本控制
postman允许对集合进行版本控制,你可以像管理项目代码一样管理一个集合。
创建分支
点击集合的···更多菜单,选择Create a Fork,输入这个分支的标签和拉到的workspace,然后点击Fork Collection。注意,如果这个集合有相关的mocks或者monitors,分支是没有的,你要重新为分支创建。
拉取变更

合并变更
解决冲突
有时候一个分支会被两个或更多的人进行更改操作,这个时候,在Merge change的时候需要选择使用哪个改动,注意,选择以后还是要点击Merge all changes进行合并。

关于脚本
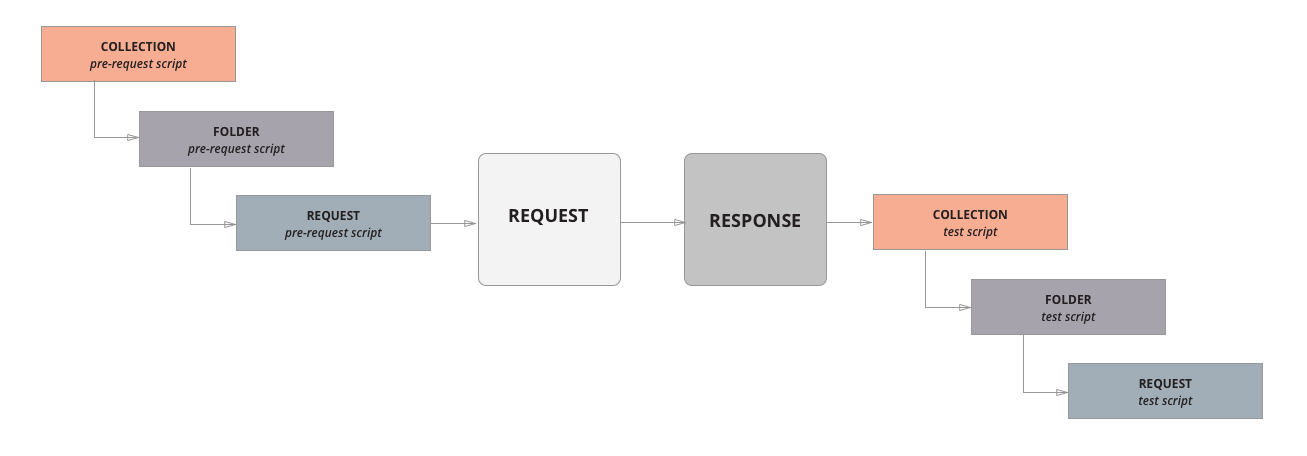
脚本的执行顺序
在一个集合中,可能有集合的脚本、文件夹的脚本、请求的脚本,脚本还分为预执行的脚本和测试脚本,他们的执行顺序如下图所示,其中集合和文件夹的脚本,就在每一个请求之前的前后,都被执行一次。
假设有两个请求Request1和Request2在同一个集合的同一个文件夹下,我们通过log信息,来看一下各级别脚本的执行顺序:
